Hey IA’s,
There is a TON to learn about how to write auto damage estimates.
For new people it can feel overwhelming.
That is why we as mentors break down many of the large chunks of information and decisions a new adjuster, appraiser, or estimator needs to make into cheat sheets.
These sheets do NOT replace years of experience, but provide a foundation you can use to start making decisions as you acquire experience.
Paired with mentorship, good training, and willingness to learn from body shops, veterans in our industry, and experience, cheat sheets and guides are the way to make something that is complex a simple process.
Today, we’ll be discussing the IA Path Damage Appraiser Inspection Guide and how to use it.
|
|
We created this guide to be the ultimate cheat sheet for anyone writing an auto damage estimate and it is actually 5 different cheat sheets in one!
I’ll walk you through these different cheat sheets that are on the Auto Damage Appraiser Inspection Guide and how it can help you.
The 5 cheat sheets and guides are,
- Part Identification Guide
- R&I Guide
- Blend Guidelines
- Photo Guide
- Repair Hours Guide
CLICK HERE TO DOWNLOAD YOUR PRINTABLE COPY
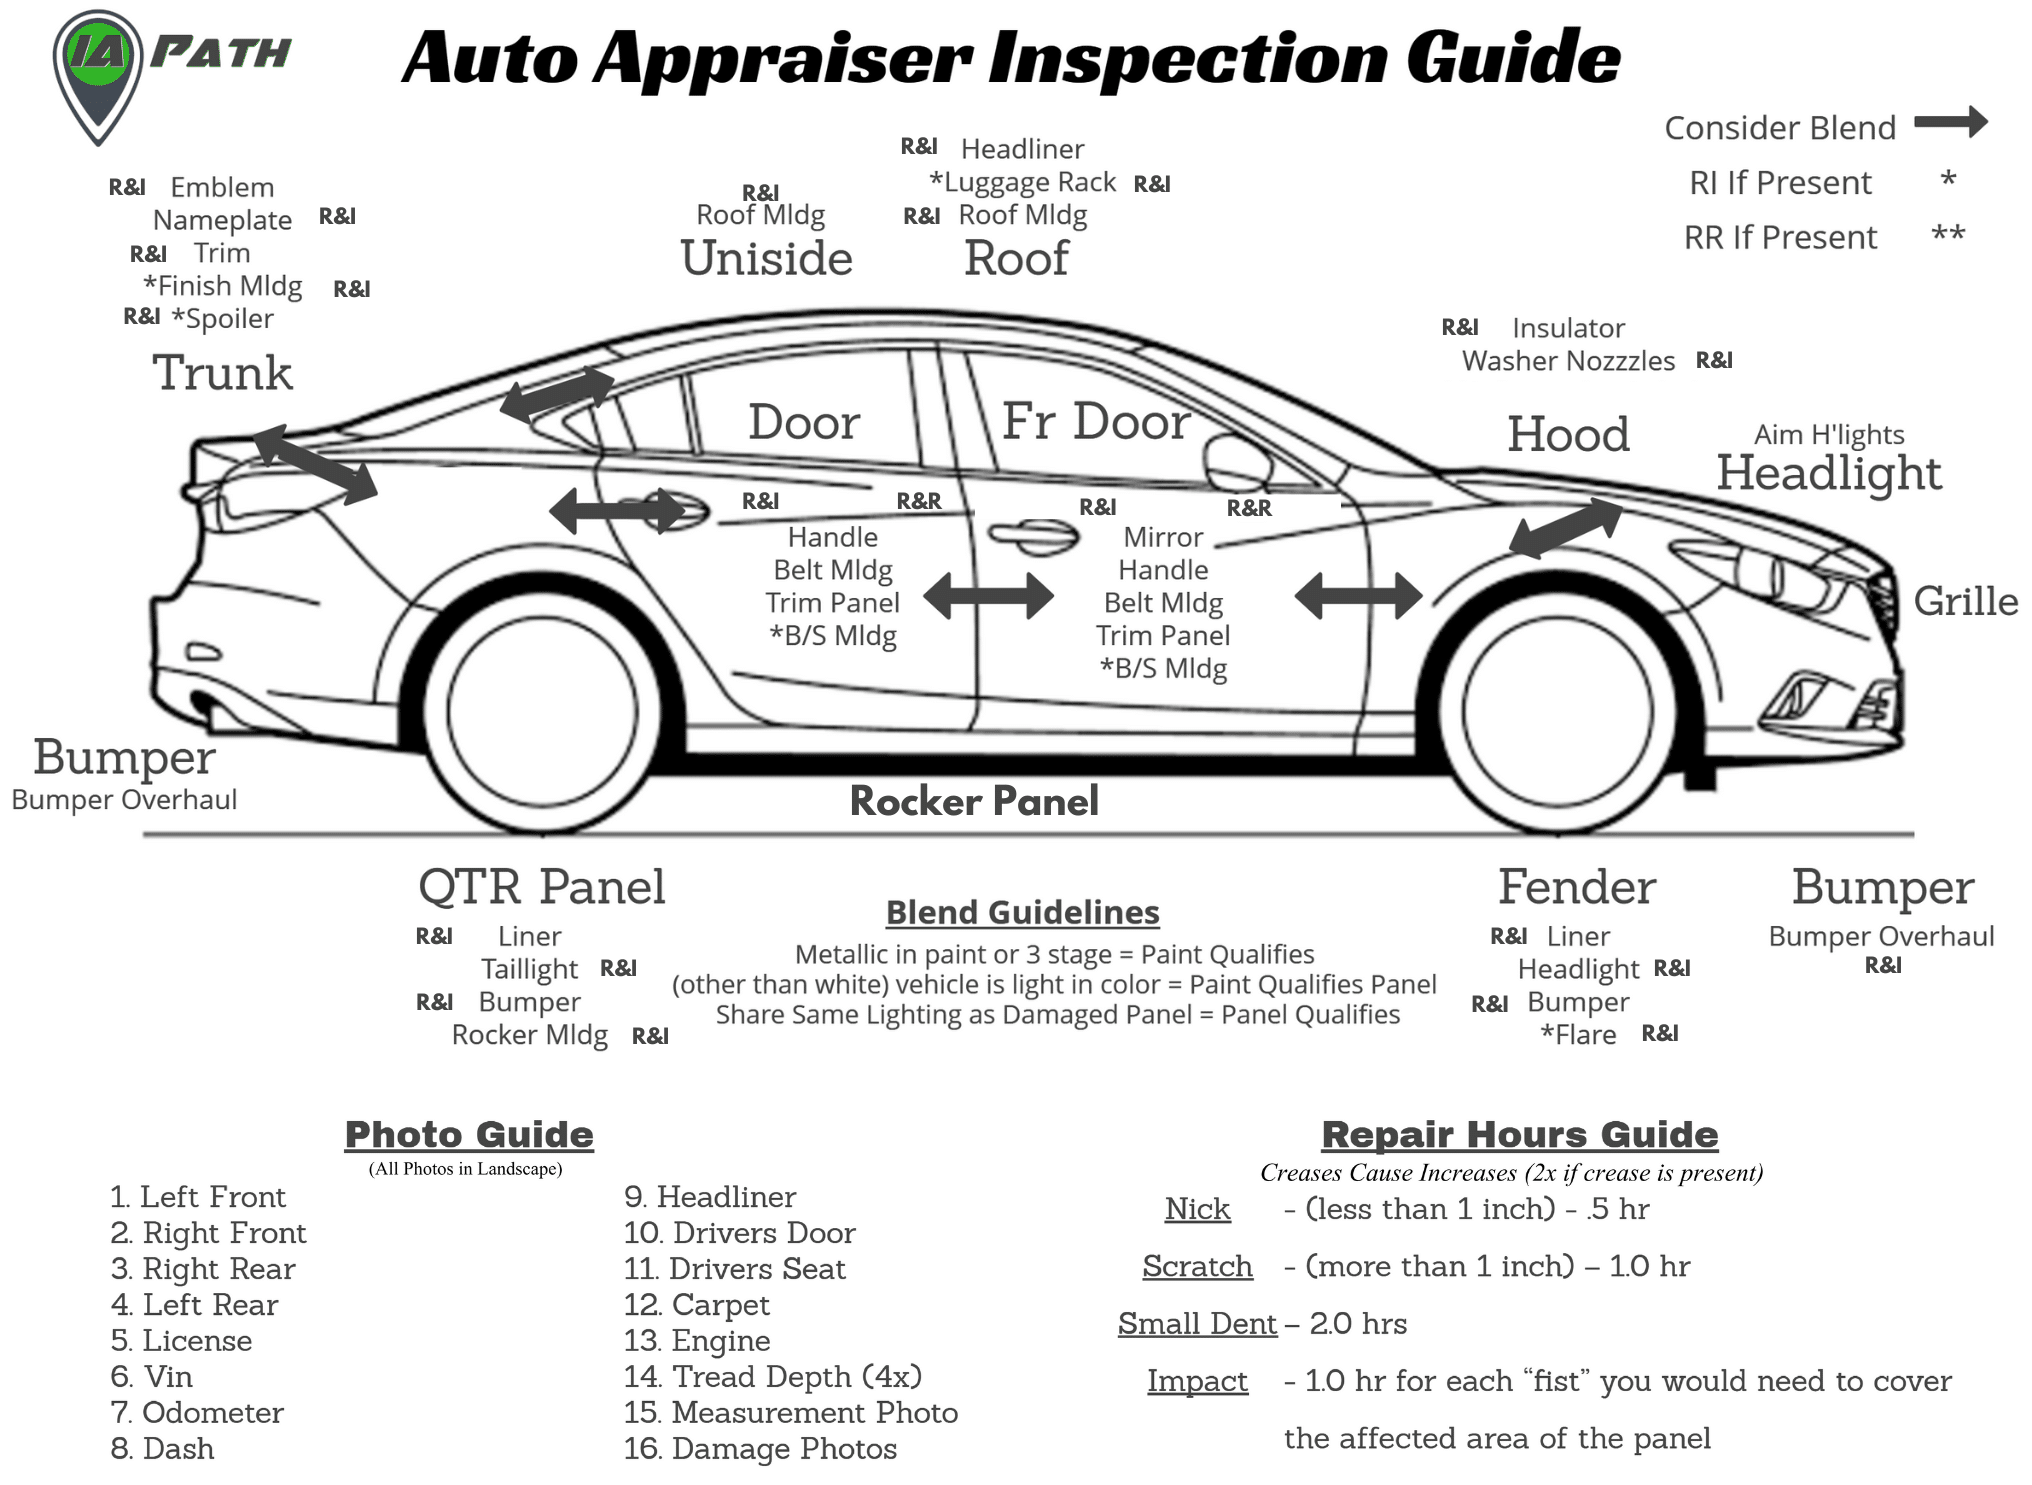
PARTS IDENTIFICATION GUIDE
First lets look at how to use it as a Parts Identification Guide.
When you are looking at a damaged exterior panel on a vehicle and your mind is blank on what it is called, you can look at the image on the inspection guide to see what the part is called.
Is it the Fender or the Quarter Panel?
|
|
The Rocker or the Uniside?
Simply scan the vehicle on the sheet and determine what major exterior part you are looking at.
R&I GUIDE
Second up on the Auto Damage Appraiser Inspection Guide is the R&I Guide.
We’ve included all the major R&I operations, which stands for removing and installing (once the vehicle has been fixed), that you need to add to your estimate if a major exterior part is being repaired, replaced, or refinished.
Just look underneath the name of the panel and you’ll see other parts listed with R&I next to them. That means if you are doing anything that requires painting the major panel you need to add those R&I items to your estimate.
Damage to the front door?
|
|
Looks like you need to
- R&I the Mirror
- R&I the Handle
- R&I the Belt Molding
- R&I the Trim Panel
- R&I the Bodyside Molding (if there is one)
And you know all this for every panel because of the R&I Guide built into the IA Path Auto Damage Appraiser Inspection Guide.
BLEND GUIDELINES
When inspecting a vehicle you may not remember how to determine if a vehicle or part requires blending.
You may forget the rules we teach you, no problem!
|
|
We lay out the 3 Steps to deciding if a part needs to be blended right there on the inspection guide.
- Is the vehicle’s paint have metallic or 3-stage paint?
- Is the vehicle’s paint light in color?
- Does the panel share the same lighting?
Let’s look at each of these.
Blend Guideline #1: The first question you ask is, “Does the paint have metallic in the paint or is it a 3 stage paint?”
You know a vehicle has metallic in the paint if it has “sparkles” or metallic specks when you look closely at it.
3-stage is something that you won’t always know with your eyes, but often your estimating system will tell you.
If the vehicle’s paint has metallic in the paint, AKA sparkles, or you find out it is a 3 stage paint, that vehicle qualifies for blend and you don’t have to ask question #2 and can skip straight to blend guideline #3.
Blend Guideline #2: If the vehicle’s paint was not metallic or 3-stage, ask the question, “Is the vehicle “light” in color (other than white)?
If the vehicle is light in color (other than white) than the paint on the vehicle also qualifies for blend, if not then it doesn’t and you can skip question #3.
If it is light in color you now have to ask question #3 to determine if the PANEL you are inspecting qualifies for blend.
Blend Guideline #3: Now that we know that the vehicle’s paint qualifies for blend we have to decide WHICH PANEL on the vehicle should be blended due to the damages?
Simply go through the questions to determine if the parts adjacent to your damaged panel require blending.
The guide also tells you what panels you need to consider blending based on your damaged part. Just look at the arrows leaving the panel that was damaged to see what panel it is pointing to.
|
|
That is a panel you need to consider blending by using the blend guidelines to see if it needs blended.
*NOTE* There are other considerations for blending and as you get experience you’ll learn them. Just know this is the foundation!
PHOTO GUIDE
There are lots of photos we need to take and missing photos is a BIG DEAL.
That is why we built in the IA Path Photo Guide right on the IA Path Auto Damage Appraiser Inspection Guide. (located in the bottom left)
|
|
We want to make sure you never miss a photo so follow the list from the 1st photo to the last photo and you’ll have all the photos you need for your claims.
Just remember to take any unique requests in your guidelines or claims, but we cover all the conventional photos right there on the inspection guide.
Next week we’ll go in depth on this photo guide, what these photos should look like, and how you take photos that’ll show the IA Firms that you are a professional they want to work with.
So many of our students stand out just because they take good photos!
REPAIR HOURS GUIDE
The Repair Hours Guide is on the bottom right corner of the Inspection guide.
It is there to help you determine how many hours you should write for based on the damages that are present.
This is for use when you are going to REPAIR a panel only and need to figure out how many hours to give the shop to repair the damaged panel.
This doesn’t replace years of experience or body shop expertise, but it’ll help you get in the ball park.
Two quick notes
- Notice the rule under the header,”CREASE CAUSE INCREASES” 2x or double the repair hours you determine if a crease is present in the panel
- Do the same thing if you determine the panel is aluminum or HSS (high strength steel), you double your repair hours
Let’s go through this.
|
|
If you are inspecting a Nick = 0.5hrs
If you are inspecting a Scratch (longer than 1 inch) = 1hr
If you are inspecting a Small Dent = 2.0 hrs
For anything bigger we consider it an Impact = 1.0hr for each “fist” you would need to cover the affected area.
This is a guide, your expertise, skill, knowledge, and unique damage will require your thinking cap, but at least you have a starting point.
And a reminder, when you go to a body shop and they have more hours than you do, don’t be offended or embarrassed, they get to spend hours and days taking the vehicle apart, fixing it, and inspecting the vehicle, you’ll likely only get to see if for 30 minutes.
And that is the 5 cheat sheets and guides that are built into the IA Path Auto Damage Inspection Guide and how to use them.
You can use this Auto Damage Appraiser Inspection Guide whenever you are inspecting a car, suv, or van.
We also made one separately for when you are inspecting trucks because there are some major part differences, but the guide works the exact same way.
|
|
We use and reference these guide A LOT in our Auto Damage Training courses.
if you want 12+ training courses on how to be a successful independent adjuster or appraiser, try out our Adjuster Training & Support Room Community FREE for 7 days and get full access to our training courses. (no certifications are included)
We offer monthly and annual plans.
| Yes, I want a 7 Day Free Trial and Access toHigh Quality Video Adjuster Training |
I hope you found that helpful!
Next week we’ll dive deep into taking high quality photographs on auto damage inspections and the photo guide mentioned briefly here.
Your Guide,
Chris Stanley